How to E-Mail a Form
1. You must FIRST SAVE your form before you can e-mail it!
2. To Email a single form, select Email Document from the Action menu. To Email multiple forms, select the forms by checking the box on the left. Click the Process Queue button and select Email Selected Forms(s).
3. Set up the Email Document screen as you need it.
Client Permission allows you to determine if the client can make changes to the form or only read/print it
No Change: This will leave the Read/Edit setting as it previously had been set for the form. This allows multiple forms to be sent with different Read/Edit settings. If you have never previously set the Read/Edit for the form, selecting one of the below will set it. Forms re Read Only by default.
Read Only: This will allow the recipient to open, read, and print the form. They will not be able to make any changes.
Editable: The recipient will be allowed to enter, change and save information in the form. They will also be able to read and print the form.
NOTE: This will change the setting for the form. If you have not previously set the Read/Edit, make sure you select one or the other to avoid finding out you sent forms with the wrong setting.
Sharing Security
Password Protected: To access the forms, the recipient will have to enter the password, which will be included with the email you send them. If Password Protected is selected a password is required. The password can be any length, but should not include any spaces. The password is not case-sensitive.
Public (No Password): No password is required. You can just email the form.
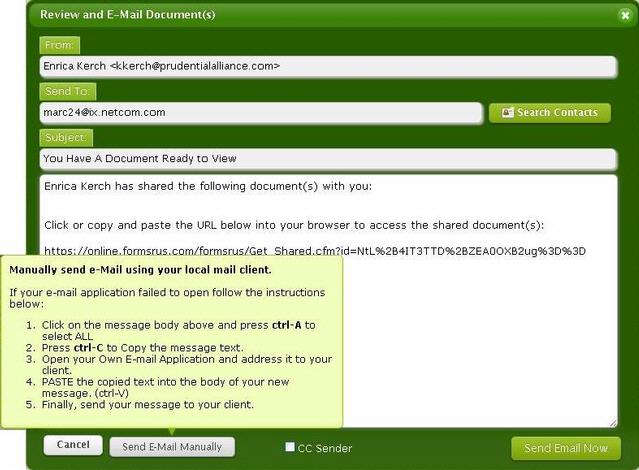
FROM:
Enter the email address of the sender here. It will default to the email address in your User Profile. If you want a different address for this email, change it here.
SEND TO:
Enter the email address of the recipient. If you need to send the email to multiple recipients, enter each email address, separated with a comma but no space. For example: john@doe.com,richard@roe.com, not tom@jones.com, mary@sue.com.
The CC Sender box will cause a copy to be sent to the sender's email if checked.
Additional Note to Sender
If you want to add information to the default you can type it here.
Once the form is complete you can click the Send Email Now button. You will get a confirmation dialog.

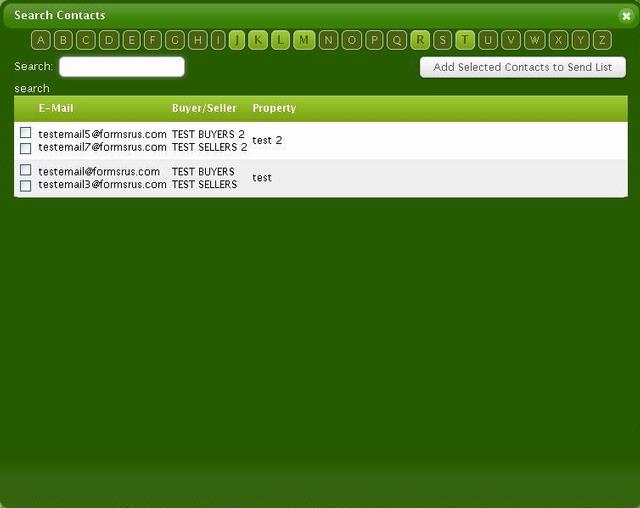
Search Contacts

You can use email addresses from your Manage Clients database. Click the Search Contacts. In the window that comes up click on the letter of the first name of the Buyer/Seller or enter the name in the Search window.
When the list comes up select the email addresses you want and click the Add Selected Contacts button. The email addresses will appear in the Send to field.
Note you can only select addresses from 1 letter at a time.
Sending Email Manual
If you want to send the email manually and use a separate email application (such as Outlook or Eudora), after filling out the Send to address, click the Send E-mail Manually. This will open your email application and create an email with the Send to address and the body pre-filled in.

If you use web-based email (such as gmail or yahoomail) you will have to copy the pre-generated email message to an email you compose yourself.